 |
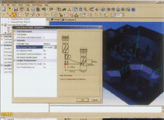
| Figure 1 Positive settings: At Renishaw, the measurement program can be inserted directly into the machining program via the software tool Active Editor. |
In terms of achieving on-time, high-quality and low-cost production, the touch-type probe can provide more support than just aligning the workpiece. That is to say, it is also of great value to directly check the geometric accuracy of the machined workpiece on the machine. Because of this direct accuracy test, programming errors and tool defects can be quickly detected, as well as the adverse consequences of the machining process. However, such detection methods are often not used because people feel that the programming is too complicated or lacks confidence in the accuracy of the machine tool. However, the basic accuracy of the machine tool is an important prerequisite for machining precision parts. Therefore, the instrumental geometry parameters should be periodically (checked) using instruments such as laser interferometers. For this measure, Renishaw () recommends the laser interferometer system, the ML10 Gold Standard. In addition, the QC10 circular measuring instrument should be used for inspection regularly. In this way, the subsequent measurements on the machine tool also create conditions for the regulation of the process.
The measurement on the coordinate measuring machine only indicates whether the processed workpiece meets the requirements and cannot be used to distinguish the influence between the machine tool, the tool and the process. If the machining deviation of the workpiece is measured, it is also difficult to derive the actual cause of the deviation, and therefore, suitable or necessary corrective measures cannot be reliably obtained from the results of such measurement.
 |
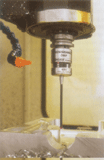
| Figure 2 Identification work: If the OMP400 touch probe is used to measure the size of the workpiece directly on the machine |
Measurement task for machine tools There are basically four typical user requirements for machine tool measurement tasks:
◆ It is only the alignment of the workpiece or the measurement of the tool;
◆ Some measurement tasks are carried out according to the drawings. The measurement cycle is integrated in the program flow, and the machining is controlled according to the measurement results, and the measurement results are simply output;
◆ All measurement tasks are directly and completely integrated in the machining program, and the machining is controlled according to the measurement results. The program is programmed according to the CAD data, and the collision test is performed through the graphic simulation, and the measurement results are output in a tabular manner;
◆ After the machining, the geometric accuracy of the workpiece is tested, programmed according to the CAD data, the collision test is carried out through the graphic simulation, the measured values are statistically analyzed, analyzed and processed, and the results are expressed and analyzed in a tabular and graphical manner.
To this end, Renishaw's measurement technology experts offer several packages designed for different requirements. If the user just wants to find a positive workpiece and a measuring tool, then the widely used cyclic measurement package for control should be used. With this package, the alignment of the workpiece and the measurement of the tool can be easily and conveniently programmed.
Replacement with control accuracy is just inspection accuracy At Renishaw, through the software family - Productivity can be independent of the machine control system used, with the support of graphical interaction, very simple programming of all the milling machine, through the Active Editor and Active Editor Pro, along with additional CAD data input, is used to incorporate all workpiece measurement programs and tool measurement programs into the machining program. Thus, these programs can achieve process adjustment through direct feedback of measurement results. This not only corrects the coordinate system of the machine tool and the data of the tool, but also based on this data, the logic can be automatically selected to some extent without the need to identify the commands required for control. In this way, this simple and well-defined rule structure also allows the user to not use some special NC instructions without having to have detailed knowledge of the program structure. To this end, the operator interface provides the appropriate predetermined values and checks if all absolutely necessary inputs have been implemented. The program and the instructions for the selected control are only generated by the operation of the post processor. Thus, when the machining plan of the machine tool changes abruptly, each parameter can be precisely adjusted like a reverse conversion. Entering the Active Editor Pro version with CAD not only further simplifies programming, but also provides a complete representation of measurement motion and measurement simulation including collision verification. This simulation also takes into account the clamping tool.
 |
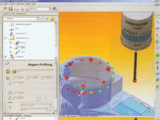
Figure 3 at a glance: Software developed in cooperation with Delcam
OMV, the processing deviation can be seen at a glance through the color point. |
Measurement and recording accuracy After processing, in order to inspect the prototype directly on the machine and inspect complex or large workpieces, Renishaw developed the Renishaw OMV software in cooperation with CAD/CAM experts from Delcam () in the UK. By clicking on the features and surfaces of the input CAD workpiece model, the OMV software can generate the required measurement programs, such as Active Editor, which provides a predetermined value suitable for actual use and performs a confidence test on input.
After the data is entered, the program displays a graphical simulation of the measurement program, which undoubtedly increases the user's confidence in the correctness of the measurement process. Using a variable-resistance strain gauge-based spindle – trigger-type probe in all measurement directions – for example with the new compact OMP400 or with the proven MP700 touch probe, the points on the surface are measured Then the meter transmits the data to the PC.
The analysis and processing of the data is done by a special measurement calculation method, which is similar to the measurement calculation method of the coordinate measuring machine, and therefore can also be used to measure complex free-form surfaces. For this purpose, the touch probes MP700 and OMP400 need to be calibrated not only in all vector directions, but also in all vector directions. In this way, the cycle time is also significantly improved because there must be a small number of measuring points per workpiece.
According to the CAD model, Renishaw's OMV software not only indicates the measured deviation, but also uses colored dots to indicate this deviation. These points produce a color map that quickly determines the accuracy of the workpiece, which provides a graphical representation of the many possibilities and measurement results for statistical analysis processing. A set of measurement points can be adapted to the CAD model (optimal satisfaction function) to avoid errors in workpiece alignment and reference point selection. Therefore, the error can be identified and corrected before the workpiece is removed from the machine. The possibility of verifying the dimensional accuracy of the workpiece under various machining conditions not only saves time, but also increases the reliability of the machining.

